
Lip neutralization is the key to achieving that perfect pout. Have you ever wondered how to create a flawless lipstick application that lasts all day? Well, look no further. Lip neutralization is the secret weapon you need to enhance the vibrancy and longevity of your lip color. By mastering this technique, you can say goodbye to feathering and smudging, and hello to a beautifully sculpted lip look that stays put from morning till night. Let’s dive into the world of lip neutralization and uncover the tips and tricks to master this essential makeup skill.

Exploring Lip Neutralization: Unlocking the Secrets of Beautiful Lips
Welcome to our detailed guide on lip neutralization! If you’ve ever wondered about the science behind achieving perfect lip color or how to correct lip pigmentation, you’ve come to the right place. In this article, we will delve into the world of lip neutralization, uncovering what it is, why it matters, and how you can achieve stunning lips with this technique. So, let’s dive right in!
The Basics of Lip Neutralization
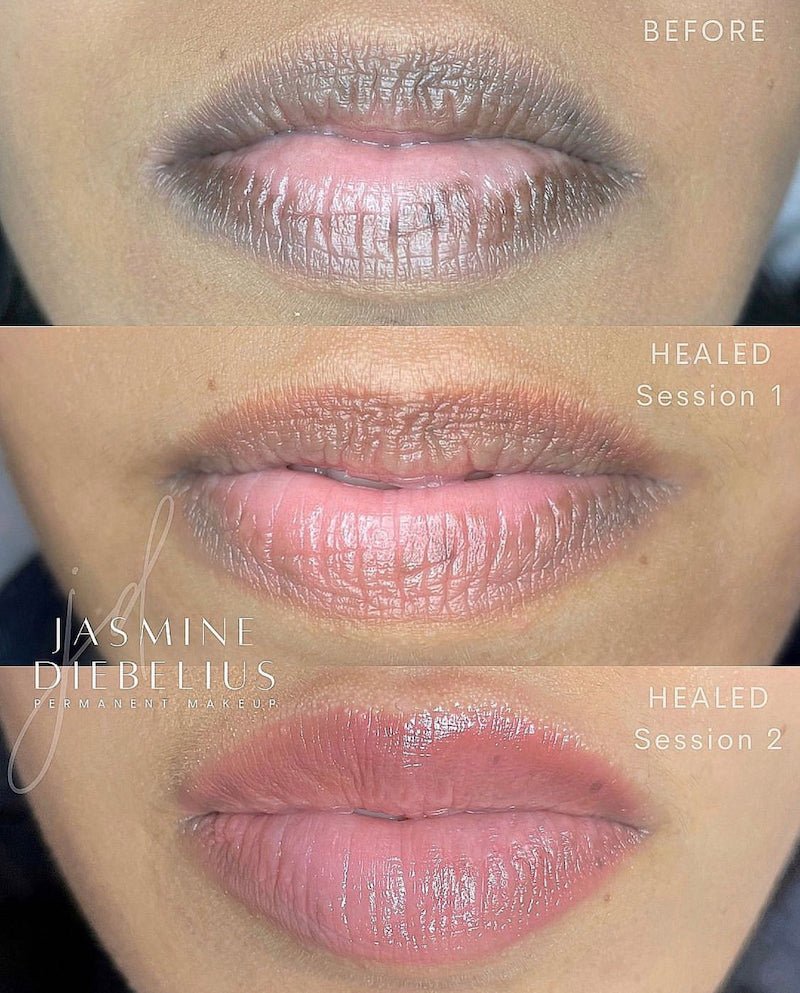
Lip neutralization is a technique used to balance and correct the natural color of the lips. Just like how we use foundation to even out our skin tone, lip neutralization aims to create a smooth, uniform base for lip color application. The process involves using specific products and techniques to neutralize any discoloration or uneven pigmentation on the lips.
Understanding Lip Pigmentation
Before we get into the details of lip neutralization, it’s essential to understand lip pigmentation. The natural color of our lips is determined by the amount of melanin in the skin. Melanin is the pigment that gives our skin, hair, and eyes their color. Lips can vary in color from person to person, ranging from pale pink to deep brown.
However, factors such as sun exposure, smoking, aging, and genetics can lead to changes in lip pigmentation, causing issues like hyperpigmentation (darker spots) or hypopigmentation (lighter spots) on the lips. This is where lip neutralization comes in handy, helping to balance out these variations to create a flawless canvas for lip products.
The Science Behind Lip Neutralization
Lip neutralization involves using color theory to counteract the undertones present in the lips. Just like how a green color corrector is used to cancel out redness on the skin, specific colors are used in lip neutralization to address different pigmentation issues. The key is to choose the right shades that complement your natural lip color and create a neutral base.
Common Lip Neutralization Colors
When it comes to lip neutralization, there are a few key colors that are commonly used to address different pigmentation concerns:
- Orange: Orange tones are great for neutralizing blue or purple undertones on the lips, making them ideal for darker skin tones.
- Peach: Peach shades work well to balance out dark spots or hyperpigmentation on the lips, creating a more even tone.
- Pink: Pink hues can help brighten and lighten the lips, especially for those with lighter skin tones or hypopigmentation.
By understanding the color wheel and how complementary colors work together, you can effectively neutralize any discoloration on your lips and achieve a flawless look.
How to Perform Lip Neutralization
Now that you have a grasp of the basics, let’s talk about how you can perform lip neutralization at home. While this technique is often done by professional makeup artists, you can also try it out yourself with the right products and tools.
Step 1: Prep Your Lips
Start by exfoliating your lips to remove any dead skin cells and create a smooth surface. You can use a lip scrub or a gentle exfoliating brush for this step. Follow up with a hydrating lip balm to moisturize and soften your lips.
Step 2: Choose the Right Product
Invest in a color corrector or a lipstick shade that complements your lip color. Remember to choose a shade that is opposite to the undertones you want to neutralize. For example, if you have dark spots on your lips, opt for a peach or orange corrector.
Step 3: Apply the Product
Using a lip brush or your fingers, apply the color corrector to the areas of your lips that need neutralization. Start with a small amount and build up the coverage as needed. Blend the product well to ensure a seamless finish.
Step 4: Follow Up with Lip Color
Once you’ve neutralized your lips, you can apply your favorite lip color on top. The neutralized base will help the color pop and stay true to its shade. Finish off with a lip gloss or balm for added hydration and shine.
Benefits of Lip Neutralization
There are several benefits to incorporating lip neutralization into your makeup routine:
- Even Lip Color: Lip neutralization helps create a uniform base for lip products, ensuring that the color appears vibrant and consistent.
- Correction of Pigmentation Issues: By neutralizing any discoloration on the lips, you can address pigmentation concerns and achieve a flawless look.
- Long-Lasting Results: A neutralized base can help your lip color last longer and prevent it from fading or changing throughout the day.
Congratulations, you’ve now unlocked the secrets of lip neutralization! By understanding the science behind this technique and how to apply it effectively, you can achieve beautiful, flawless lips that enhance your overall makeup look. Whether you’re dealing with dark spots, pigmentation issues, or simply want to create a perfect lip canvas, lip neutralization can be a game-changer in your beauty routine. So, next time you reach for your favorite lip color, remember the power of neutralization and watch your lips transform into a work of art!